Alas, all good things must come to an end. Today we have the third tutorial for digital prints, inspired by those found on Pinterest, and created using the web service PicMonkey.
Without any further to do...
I Love My State Print Tutorial
Just as a reminder, we have here the inspiration.
Step 1.
Go to picmonkey.com and choose edit a photo.
Step 2.
Open your background picture.
(If this is you're first time here or you don't remember how, please refer to this post on what I'm talking about and how to do it.)

Step 3.
I find it helpful to go ahead and crop the picture at this point if you plan to use a service to print your poster. Otherwise, you may have to crop and cut off letter or the resolution may not be good and so forth and so on. When you go to the left and select the Basic Edits function, Crop will be the first option. When you select Crop, there will be a drop down menu that will more than likely say 'No Fixed Proportions.' Click on this drop down menu and select the size you plan to have it printed as. I will do mine as an 8x10.
Step 4.
The best way to crop you're background and still have room to make you're poster is to align the one of the corners of the crop box with the corner of you're background.
Once you've done that, drag the bottom corner to make the box as large as possible.
Step 4.
Time to go on a detour. You're going to want to find a silhouette of your state. To do this, Google it. It's what I did.
Step 5.
This next part may seem unnecessary but, trust me, it is necessary.
Open Microsoft Word, PowerPoint, or Excel and open your picture once inside the program.
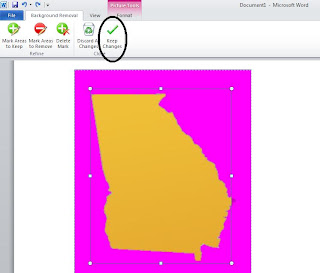
Then use the Remove Background feature.
Adjust the dimensions of the box to fit your state and select Keep Changes.
Right click and Save your image in a place you can find it.
Step 6.
Now let's head back to PicMonkey.
Once you click the Overlay/Sticker button, at the very top the is a button that says 'Your Own.' Click this button and a screen will pop up and allow you to choose one of your pictures. In this case, you will use your state image. Once in PicMonkey, you can change the color of your state as I did.
Step 7.
Go back to the left and you should still be under the Overlays tab. Once there, select the Hearts tab. You can choose any heart you like but, I liked the more traditional looking one.
Once you choose your heart, add it.
Step 8.
Once you add your heart, it's highly recommended that you change the color. The sooner the better since you will no be able to see for it the background. You will also need to re-size it. Unlike every other tutorial I've posted. You will need to make the heart smaller. Well, you don't NEED to BUT it make the city you're trying to indicate easier to discern.
And you're done!
Congratulations! By following these three tutorials, you have increased your PicMonkey savvy by a bazillionfold. Enjoy making all sorts of fun, amazing and impressive prints.


No comments:
Post a Comment